How picogame works
picogame keeps your scene objects between frames. You change their state, call scene.refresh(),
and the engine redraws the affected regions. This page explains that model and the game loop around it.
New to game terms? Any unfamiliar word here is defined in the Glossary.
The big idea: describe the scene, then say what moved
Section titled “The big idea: describe the scene, then say what moved”Most of a game’s screen doesn’t change from frame to frame: the background stays put, only a few things move. picogame is built around that.
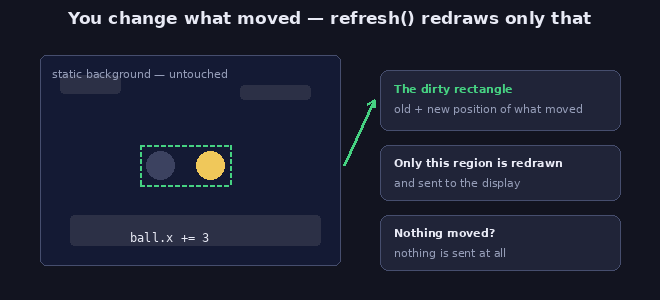
You describe a scene once (these sprites, this tilemap, this background), and then each frame
you just change what moved (ball.x += 3) and call scene.refresh(). The engine works out
which little rectangles actually changed (each a dirty rectangle) and
redraws only those; it doesn’t repaint the whole screen. Nothing moved? Nothing is sent to
the display.
For the levers that keep a game at a steady 30 FPS as it grows, see Performance.
The work usually follows how much changed, not the full screen size. Camera movement and always-dirty layers are the main exceptions because they repaint the play area. The engine tracks the regions for you.
The pieces you build a scene from
Section titled “The pieces you build a scene from”These are the main objects you can put in a scene:
- Sprite — a movable picture: the player, an enemy, a bullet, a coin. It has a position, can be flipped, animated through frames, scaled and rotated.
- Tilemap — a big grid built from a small set of tile pictures: a level, a tiled background, a brick wall. Cheap, because the grid stores one number per cell instead of every pixel.
- Bitmap — the actual picture a sprite or tile draws. You can generate one in code (a circle, a rectangle) or convert it from a PNG.
- Scene — the container that holds all of the above and draws them in order. Each thing it draws is a layer (one thing the scene draws, stacked back-to-front); you add things to it, then refresh it each frame.
- A camera — the scene has a viewpoint you can move (
set_view), so the world can be bigger than the screen and scroll as the player walks.
There are a few more specialised pieces (a drawing Canvas, full-frame StripDraw effects, Particles); you’ll reach for those once you need them. See the feature guide for “which one when”.
The game loop
Section titled “The game loop”Every picogame game is the same shape:
- Read input — which buttons are down.
- Update — move things, run game rules, spawn and remove objects.
- Refresh —
scene.refresh()draws the changes. - Wait — a clock caps the framerate so the game runs at a steady speed.
while True: buttons.poll() # 1. input ball.x += speed # 2. update scene.refresh() # 3. draw what changed clock.tick() # 4. hold the framerate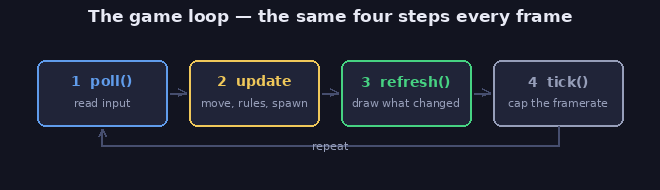
Collisions, sound, scoring, and other game rules belong in step 2.
This 4-step shape is universal. Once a game has more than one screen (title / play / game-over) and
needs to restart, hold its state in one object and move this loop into a main() function — see
Game patterns for that shape and why.
You build before touching hardware
Section titled “You build before touching hardware”The same game code runs off the device, so you design, debug and iterate there first. The browser-based option is the Playground; for hands-on local work there’s also a desktop simulator (headless screenshots for quick checks, or a live window). All three environments share the game-facing API - but not the runtime: RAM limits, timing, input feel, audio and panel-specific effects only exist for real on the device. Smoke-test on hardware regularly during development, not once at the end.
Where to go next
Section titled “Where to go next”New here? Build your first game, then continue with the tutorials. Use the feature guide and reference when you need to choose a tool or check a signature.
Already know an engine (or displayio)? Skip the tutorial and jump to the concept map and glossary, then the reference.
- Make your first game — put this into practice in five minutes.
- The tutorials — three games, one idea per step.
- Feature guide — once you know the shape, this is “which tool for which job”.
- API reference — the precise, complete list when you need exact signatures.