Supported hardware
picogame is a native module in CircuitPython itself, compiled into a board’s firmware when that board opts in — it needs an SPI display (or a framebuffer), a few buttons, and (optionally) a speaker. CircuitPython 10.3.1 ships it on the PicoPad and the Fruit Jam; current main adds the PicoSystem, Pico, Pico W and the PyBadge. For everything else, and for the fork-only extras, the builds below are ours; other CircuitPython boards with an SPI display can be ported (see Build your own board). The reference device everything is tuned and measured against is the PicoPad.
Devices
Section titled “Devices”| Device | MCU | Notes |
|---|---|---|
| Pajenicko PicoPad | RP2040 | Primary / reference device. 320×240 ST7789, D-pad + A/B/X/Y, speaker, SD, NVM. A prebuilt firmware and button profile are provided. |
| Adafruit Fruit Jam | RP2350 | DVI/HDMI output through a RAM framebuffer instead of an SPI panel, TLV320 I2S audio, USB-host gamepad/keyboard. Tested on hardware. |
| Raspberry Pi Pico / Pico W, Pimoroni PicoSystem | RP2040 | Picked up picogame in stock CircuitPython on current main. The PicoSystem has its own screen and buttons; a bare Pico needs both wired (see below). |
| Adafruit PyBadge | SAMD51 | 160×128 ST7789 on a 24 MHz bus, shift-register buttons, accelerometer, true-DAC audio. Has the fast DMA display backend and RGB444. |
| PicoPad 2 / other RP2350 boards | RP2350 | Build-only (not yet verified on this hardware). Same layout and a larger heap than the RP2040 builds. |
| ESP32-S3 boards (e.g. Feather TFT) | ESP32-S3 | Build-only (not yet verified on this hardware). Wire the buttons for your board (see below). |
| Desktop simulator | your PC | A development tool rather than a hardware target. It runs the same game-facing API but does not reproduce device RAM limits or timing. |
The engine is a native C module in CircuitPython, off unless a board turns it on. PicoPad has a prebuilt firmware; for a board without one you build CircuitPython for it yourself, see The firmware build.
Download firmware
Section titled “Download firmware”Each link below is a firmware build for one board. Flash it, then copy code.py and the
required lib/ modules from picogame-libs.
| Board | Firmware |
|---|---|
| Pajenicko PicoPad (RP2040) — tested | picopad.uf2 |
| PicoPad 2 (RP2350) — DIY | picopad2.uf2 |
| PicoPad 2 W (RP2350) — DIY | picopad2w.uf2 |
| Pimoroni PicoSystem (RP2040) | picosystem.uf2 |
| µGame22 (RP2040) | ugame22.uf2 |
| Raspberry Pi Pico (RP2040) | pico.uf2 |
| Raspberry Pi Pico W (RP2040) | pico_w.uf2 |
| Raspberry Pi Pico 2 (RP2350) | pico2.uf2 |
| Raspberry Pi Pico 2 W (RP2350) | pico2_w.uf2 |
| TinyCircuits Thumby Color (RP2350) | thumby_color.uf2 |
| Adafruit Fruit Jam (RP2350B, DVI/HDMI out) — tested: DVI display, TLV320 audio, USB input, launcher | fruitjam.uf2 |
| ESP32-S3 — generic (Adafruit Feather TFT) | feather_s3.uf2 |
| µGame S3 (ESP32-S3) | ugame_s3.uf2 |
| VIDI X (ESP32) | vidi_x.bin |
The two PicoPad 2 builds are DIY / unofficial, for a PicoPad whose Pico module has been swapped for a Pico 2 / Pico 2 W (RP2350). There is no official Pico 2 PicoPad product and no official CircuitPython for it: same PicoPad hardware, just more RAM (~520 KB heap). Use at your own risk.
The Fruit Jam build renders through the DVI framebuffer instead of an SPI panel, and is a
well-tested platform — DVI rendering, TLV320 audio, USB gamepad/keyboard input and the on-device
launcher all run on hardware. Configure it in
settings.toml (CIRCUITPY_DISPLAY_WIDTH/_HEIGHT/_ROTATION) with one of two colour depths —
setup() handles either automatically: CIRCUITPY_DISPLAY_COLOR_DEPTH=16 for full-colour RGB565
(e.g. 320×240), or =8 for RGB332, the only depth picodvi offers at 640×480 (full resolution).
See Run on hardware for the framebuffer/colour-depth details.
Audio on the Fruit Jam is the I2S TLV320 DAC — install adafruit_tlv320 + adafruit_bus_device
in CIRCUITPY/lib (they aren’t bundled), or it’s silent; PICOGAME_DEBUG=1 prints why. The driver’s
own defaults are near-inaudible, but picogame_audioout raises them for you — the
PICOGAME_HP_VOLUME / PICOGAME_SPK_VOLUME keys only trim that level. Input is a USB gamepad or keyboard (the board has no game buttons) — see
Input & controls.
Flashing: put the board in bootloader mode. Pico/PicoPad: hold BOOTSEL while connecting USB
(or double-tap RESET) → an RPI-RP2 USB drive appears → drag the .uf2 onto it → it reboots as
CIRCUITPY. Then copy your code.py + the lib/ modules it imports. On a bare Pico, also wire a
display + buttons and build the display in code (see Build your own below).
About .mpy files: a game folder may hold an mpy/ subfolder. Those are compiled
MicroPython modules (the game’s data/asset modules run through mpy-cross): they import faster,
take less storage, and, most importantly on a tiny-RAM board, skip the parse-time RAM spike a large
.py causes at import. On hardware, copy the mpy/ files next to code.py (not the loose .py
assets); the loose .py are the source the simulator runs directly. Same idea as the shipped
lib/*.mpy engine helpers.
The classic ESP32 (VIDI X) ships a .bin flashed with esptool (no UF2 bootloader); ESP32-S3
boards still use drag-and-drop UF2.
What a board needs
Section titled “What a board needs”- A CircuitPython-supported MCU — RP2040, RP2350, SAMD51 and ESP32-S3 are the tested families.
- RAM usually sets the asset budget. The current measured builds provide about 190 KB of heap on RP2040 and 520 KB on RP2350; the largest contiguous block is smaller and varies with firmware configuration. Measure your build (see Fit it in RAM).
- An SPI display driven by
displayio(or a DVI/HSTX framebuffer on RP2350 boards like the Fruit Jam). - A few buttons on GPIO — a D-pad + A/B is the baseline; X/Y are optional. Or a USB gamepad/keyboard on a USB-host board.
- Optional: a PWM-capable pin for a small speaker, or an I2S DAC (sound is opt-in).
Displays
Section titled “Displays”picogame uses the displayio SPI display stack. The controllers listed below are the current
tested or supported targets; other displayio SPI displays may need verification.
- Resolution is flexible, if the game reads it. 320×240 is the reference size. The engine and
Scenerender to whatever size the display reports, but a game has to lay itself out from that size rather than hardcode 320×240: readpicogame_game.screen()and derive your layout from it. Thearkanoidexample does exactly that (brick width = display width ÷ columns), so the same file runs on 240- and 320-px screens. Less width/height just means a smaller play area. - Controllers: ST7789 is the reference (PicoPad). ST7735 (smaller panels) and ILI9341
also work, as do other
displayio-supported SPI controllers. - 12-bit colour (RGB444): the firmware can send 12-bit instead of 16-bit to cut SPI traffic on
transfer-bound scenes. It is an opt-in, compile-time capability: the default everywhere is RGB565,
and a game enables 12-bit only where the board advertises it (
picogame.RGB444_SUPPORTED, e.g.rgb444="auto"inpicogame_game.setup), or the owner turns it on for the whole board withPICOGAME_RGB444 = 1insettings.toml. Requestingrgb444=Trueon a build without the support raises an error rather than mis-driving the panel (ST7789/ST7735 have COLMOD 12-bit, ILI9341 does not). Details in Clocks, SPI & display limits.
Build your own on a breadboard
Section titled “Build your own on a breadboard”No board from the list? A picogame console is cheap to build yourself. The minimum is:
- a Raspberry Pi Pico — Pico 1, Pico W or Pico 2 all work;
- a 320×240 SPI display with an ST7789 or ILI9341 controller;
- at least 6 buttons — a D-pad + A/B (add X/Y for two more);
- a small piezo buzzer for sound (optional).
That’s enough to play everything on this site. The full pin map, the three ways to get
board.DISPLAY, the settings.toml button config, and orientation/colour troubleshooting are in
Build your own board.
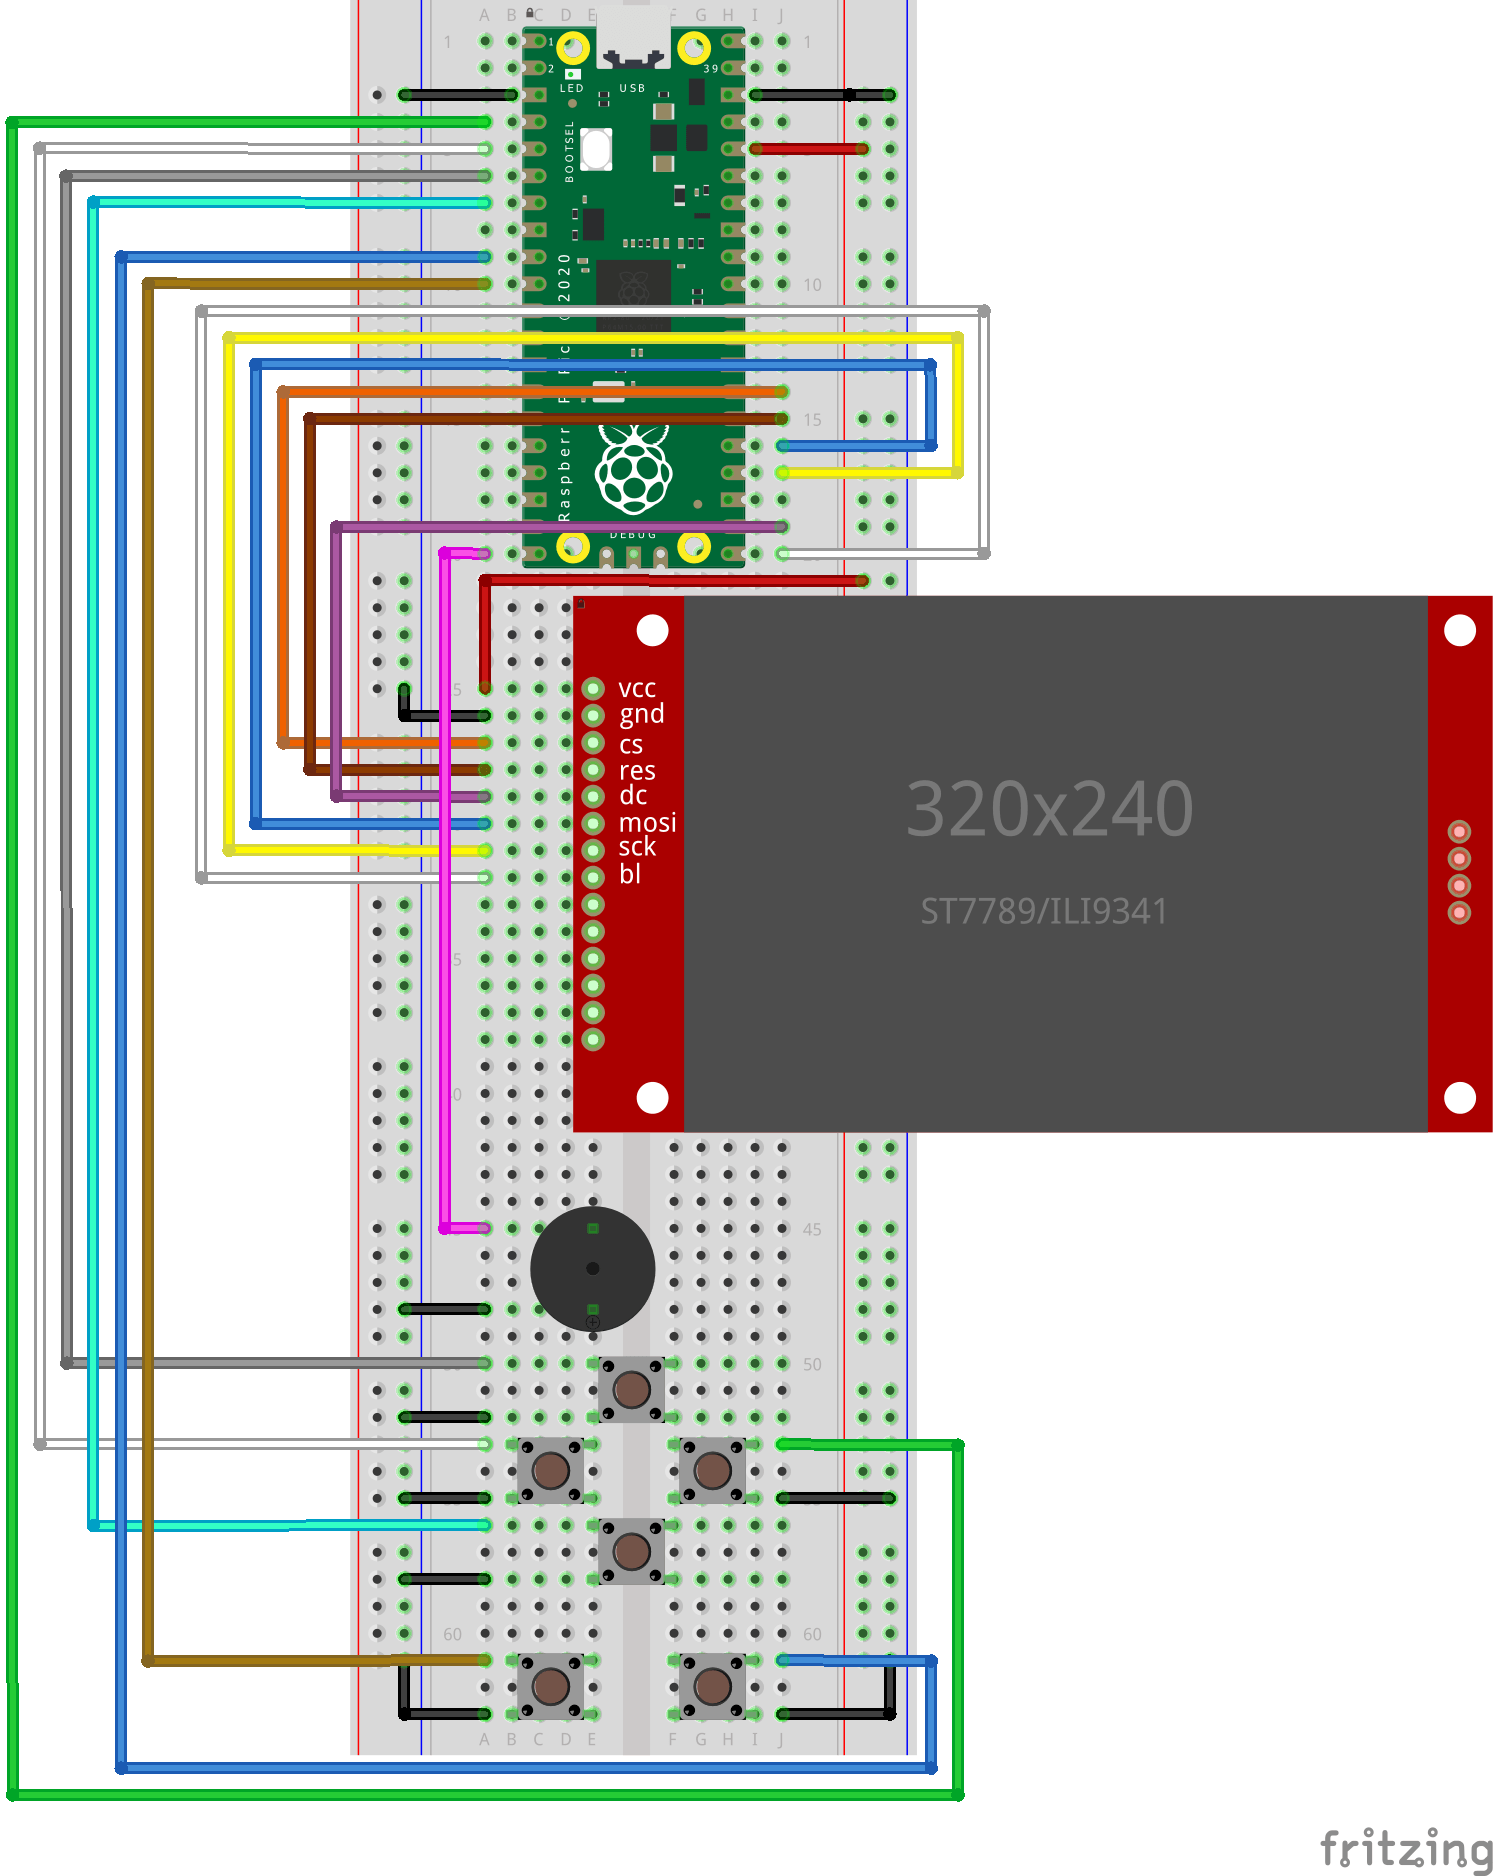
Wire the display’s vcc / gnd / cs / res / dc / mosi / sck / bl, the six buttons and the piezo as
shown. The exact GPIO pins and the matching settings.toml button map are on
Build your own board; a build video is on the way.