Skip to content

Pseudo-3D & 3D (Mode-7, raycasting, iso, road, polygons)

Five ways to get a 3D-looking world out of a 2D engine. The first four are classic pseudo-3D tricks (no 3D world exists behind them); the last is real flat-shaded polygon 3D (an Elite-class pipeline: free camera, arbitrary geometry, honest perspective). See /reference/ for the signatures.

You want Reach for How it draws
A ground / floor that recedes to the horizon picogame_mode7.Camera (drives the C Canvas.mode7) C primitive, per-scanline - fast
Walls / a first-person corridor picogame_ray.Raycaster native DDA caster + temporal repaint
An isometric board (RPG / tactics / builder) picogame_iso.IsoView integer-only Python + one fill_triangles batch
An OutRun-style racing road pg.road_edges + Canvas.road C per-scanline loop into a StripDraw - 30 fps on RP2040
Real polygon 3D (blocky worlds, low-poly) pg.project + Canvas.fill_triangles batch C projection + batch C fill

Both draw into the below-horizon rows and leave the sky to you; you fill the rows above the horizon yourself (a flat colour, a gradient, or fx.Sky).

A Mode-7 racer - the road recedes, rumble stripes rush toward you

A Mode-7 perspective floor: each screen row below the horizon samples one distance into a texture, so a flat top-down image reads as a ground plane stretching to the horizon. All the maths lives in this Python helper; the per-scanline fill is the C engine primitive Canvas.mode7, so it is cheap.

import picogame_mode7 as m7

  • Camera(fov=0.66) - holds the field of view (higher = wider, more fish-eye). Reuse one camera; pass the pose to draw() each frame.
  • .draw(canvas, texture, x, y, angle, horizon, height, y_off=0) - fill canvas (a Canvas or a StripDraw view) below horizon with a receding view of texture. x/y are the camera position in world (tile) units, angle is the heading in radians, horizon is the screen row of the horizon line, and height is how high the camera sits (bigger = the ground recedes slower, so you see further). In a StripDraw callback pass y_off=vy so the perspective divide uses the absolute screen row.

texture must have power-of-2 width and height, and one world unit = one full texture tile. A texture that tiles seamlessly (grass, a road with rumble stripes) can use a large height and wrap forever; a single non-tiling image (one closed circuit) needs a small height or the far distance repeats it.

import picogame as pg
import picogame_mode7 as m7
cam = m7.Camera(fov=0.9)
def ground(view, vx, vy, vw, vh):
for r in range(vh): # sky: fill rows above the horizon yourself
if vy + r < HORIZON:
view.fill_rect(0, r, vw, 1, SKY)
cam.draw(view, TRACK, car.x, car.y, car.heading, HORIZON, 5.0, y_off=vy)
scene.add(pg.StripDraw(ground, 0, 0, W, H)) # 0 retained bytes
# ...each frame: move car.x/y/heading, then scene.refresh()

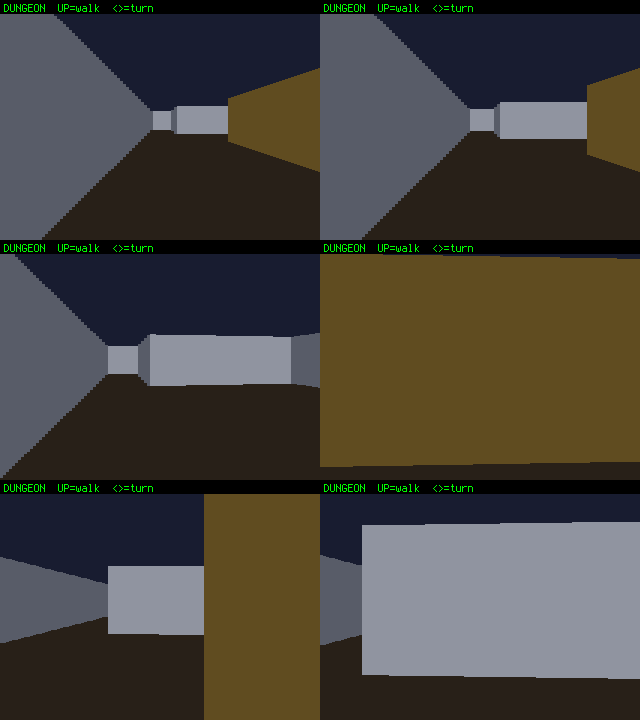
A first-person raycaster - a dungeon corridor with depth-shaded walls

A Wolfenstein-style raycaster: one DDA ray per screen column finds the nearest wall, and each column is drawn as a vertical bar shaded by which axis the ray hit (the classic two-tone Wolfenstein look - N/S faces get the near colour, E/W the side colour; there is no distance term in the wall colour). The caster DOES hand you the per-column perpendicular distance, so distance effects (fog, sprite falloff) are yours to add on top. The render path is fully native: the engine caster pg.raycast (integer 16.16 C on device, a Python version in the sim) runs the per-column DDA AND emits the RLE-merged wall runs in the same pass; the lib does the once-per-frame trig and paints the runs with one Canvas.vspans batch per strip into a StripDraw view.

import picogame_ray

picogame_ray.Raycaster - first-person wall caster

Section titled “picogame_ray.Raycaster - first-person wall caster”
  • Raycaster(world, wall_colors, sky, floor, fov=0.66, stride=2) - world is a list of equal-length strings ('0' = empty, '1'..'9' = wall types); wall_colors maps each wall type to a (face_colour, side_colour) pair (the side colour a touch darker = a free depth cue); sky/floor are wire-RGB565 backgrounds. stride casts one ray per N columns - the perf/quality knob (see below).
  • .cast(px, py, ang, sw, sh) - cast the rays for camera position (px, py) and heading ang, caching each column’s wall span. Call once per frame before scene.refresh().
  • .draw(view, vx, vy, vw, vh) - the StripDraw callback: paints the sky/floor bands, then the pre-merged wall runs with one Canvas.vspans batch call. Row 0 is the top of the raycast VIEW, not of the screen (the horizon sits at half the sh you gave cast()). If the layer does not start at screen y=0 - the reserved-HUD-band pattern, setup(top=BAND) + StripDraw(cb, 0, BAND, W, H - BAND) - pass vy - BAND, or the whole picture renders BAND pixels too high: its top hides under the HUD and a strip of bare floor colour is left at the bottom. The alternative is a full-screen view (cast(..., H), layer at y=0) with the HUD floating over it as fixed SceneLabels - it costs no view height, which suits a first-person game.
  • .solid(x, y) - is the map cell at integer (x, y) a wall? Use it for movement collision (out of bounds counts as a wall).
  • .attach(stripdraw) - opt into temporal rendering: pass the StripDraw (created always_dirty=False) that draws this raycaster, and cast() invalidates only the column band that changed since the previous frame (a still camera repaints nothing). Big win when standing / moving slowly.
  • .zbuf - after cast(), each column’s wall distance (16.16 fixed-point; the depth buffer project_sprite tests against).
  • .project_sprite(sx, sy, margin=0.2) - project a world-space point (sx, sy) onto the screen for the last cast(). Returns (screen_x, size, depth), or None if the point is behind the camera or hidden by a nearer wall. size is the on-screen height in px at the wall scale - set sprite.scale = size / bitmap_height; sort your sprites by depth far-to-near so nearer ones draw on top. margin is z-test slack so a sprite flush against a wall is not culled.
import picogame as pg
import picogame_ray
MAP = ["1111111111", "1000000001", "1011100201", "1000000001", "1111111111"]
WALLS = {1: (pg.rgb565(150, 150, 160), pg.rgb565(95, 95, 110)),
2: (pg.rgb565(170, 90, 60), pg.rgb565(110, 55, 35))}
rc = picogame_ray.Raycaster(MAP, WALLS, pg.rgb565(30, 30, 48), pg.rgb565(40, 34, 30), stride=2)
scene.add(pg.StripDraw(rc.draw, 0, 0, W, H))
# ...each frame:
rc.cast(px, py, ang, W, H) # cast, then paint
scene.refresh()
# ...to move without walking through walls:
if not rc.solid(int(nx), int(py)):
px = nx

The raycaster draws only walls; enemies and pickups are ordinary Sprites scaled and placed each frame from project_sprite, depth-tested against the walls so they hide behind corners. Add the sprites to the Scene after the StripDraw so they layer on top, and reuse a picogame_pool.Pool rather than creating them per frame.

GUYS = [Enemy(3.5, 2.5), Enemy(6.5, 3.5)] # world (tile) positions
SLOTS = [pg.Sprite(DEMON_BMP, -40, -40) for _ in GUYS] # one reusable sprite per guy
for s in SLOTS:
s.anchor = (0.5, 0.5)
scene.add(s) # AFTER the StripDraw -> on top of walls
def frame():
rc.cast(px, py, ang, W, H) # cast walls (fills rc.zbuf)
# A Scene draws its items in the order they were ADDED, and adding happened once, above. So
# sorting a list of your own objects cannot change what covers what - you have to sort, then
# write the sorted guys into the fixed slots. The nearest lands in the LAST slot, which is
# drawn last, which is on top.
GUYS.sort(key=lambda g: -((g.x - px) ** 2 + (g.y - py) ** 2)) # far-to-near
for g, spr in zip(GUYS, SLOTS):
p = rc.project_sprite(g.x, g.y)
if p:
sx, size, _ = p
spr.bitmap = g.bmp # a slot shows whichever guy it holds this frame
spr.move(sx, HORIZON) # centre on the horizon row
spr.scale = size / 8.0 # bitmap is 8 px tall
spr.visible = True
else:
spr.visible = False # off-screen or behind a wall
scene.refresh()

An isometric block board - flat-shaded cubes with breathing heights

The cheapest pseudo-3D there is: your world stays on a grid, and IsoView maps a cell (gx, gy) + elevation to screen pixels with nothing but integer add/shift - no perspective, no divide - which is why it runs well on the RP2040. Unlocks iso RPG / strategy / tactics / builder games.

import picogame_iso

  • IsoView(ox, oy, tw, th) - ox, oy = screen origin of grid cell (0, 0); tw, th = tile half-width / half-height (a classic 2:1 diamond is th = tw // 2).
  • .to_screen(gx, gy, h=0) - grid cell (+ elevation in px) → screen (sx, sy).
  • .depth(gx, gy, h=0) - the back-to-front painter’s key; sort movers by it, draw ascending.
  • .screen_to_grid(sx, sy) - inverse mapping (cursor / tap picking).
  • .cube_faces(gx, gy, height_px) - the three visible faces (top, right, left) of a raised block as triangle-ready points.
  • .emit_blocks(cells, tv, tc) - alloc-free batch: writes the flat-shaded cube triangles for MANY blocks straight into an int16 verts buffer + uint16 colour buffer, ready for one Canvas.fill_triangles(tv, tc, n) call; returns the triangle count.

The pattern that hits 30 fps on RP2040: a static board is rendered ONCE (into a half-res Canvas shown through a 2× sprite, or baked into a Tilemap), then only the movers redraw - picogame’s dirty-rects do the rest. Rebuild-every-frame scenes use emit_blocks (the Python geometry loop, not the C fill, is what dominates - the batch builder is ~2× faster than looping cube_faces yourself).

pg.road_edges + Canvas.road - the racing road

Section titled “pg.road_edges + Canvas.road - the racing road”

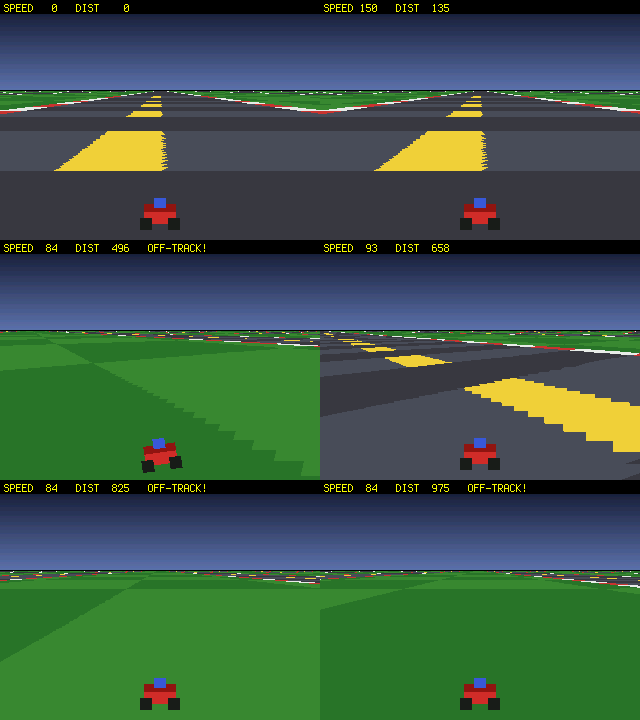
An OutRun-style road snaking through curves at full frame rate

The OutRun-genre road as two batch C calls per frame: pg.road_edges runs the whole curve-accumulator loop (curvature, hills, lateral offset → per-row integer edges), and Canvas.road draws the per-scanline strip (sky / road / rumble / centre-dash colour picks) into a buffer-less StripDraw view. What used to be a ~100-row Python loop per frame becomes two C crossings - a full-screen road holds 30 fps on the RP2040 with the game logic on top. See /reference/ for the exact table formats, and the racing-genre recipe in the game-design skill for tuning.

The wrapper owns everything below — tables, fixed-point units, the phase wrap, hills — and adds the two queries gameplay always needs (curve_at for physics, row_of/half_of/edges_of for sprites). The whole road becomes:

import picogame_road
road = picogame_road.Road(pg, W, H, H // 3, dict(
sky=pg.rgb565(90, 140, 230), road_a=pg.rgb565(110, 110, 110), road_b=pg.rgb565(100, 100, 100),
rumble_a=pg.rgb565(220, 60, 60), rumble_b=pg.rgb565(240, 240, 240), dash=pg.rgb565(240, 240, 90)),
curves=((16384, 90.0), (4096, 30.0)), hill_amp=24)
def draw(view, vx, vy, vw, vh):
road.draw(view, vy)
scene.add(pg.StripDraw(draw, 0, H // 3 - 24, W, H - (H // 3 - 24))) # hill headroom above the horizon
while True:
dist += speed
road.set_grade(grade) # hills move the horizon
road.tick(dist, player_x) # the frame's C curve pass
steer -= road.curve_at(dist) * grip # centrifugal pull, same curve model
scene.refresh()

The raw contract below is for a custom road look (or for porting the pattern elsewhere).

The reference gives the field formats; these are the decisions it leaves to you, in one place:

  • Row order: index 0 is the horizon row, index n-1 is the BOTTOM of the screen (nearest). The curve accumulator runs bottom-up. Per strip you pass ri0 = vy - horizon to view.road() - rows above the horizon (ri < 0) are filled with the sky colour.
  • You build hw (and tab) yourself, once at startup. For a flat road the perspective is simply linear in the row: with t = (i + 1) / n (0 at the horizon, 1 at the bottom), hw[i] = int(HALF_WIDTH_AT_BOTTOM * t * 65536). Scale the per-row tab fields the same way - edge_w/dash_hw grow with t, and the two Q8 stripe phases come from the world depth (z = 1 / t), e.g. wb05 = int(z * 40) & 0x7FF.
  • Array typecodes are part of the contract - the C binding takes raw buffers: rl, rr, tab = array("h") · hw, cfg = array("i") · colors = array("H"). A wrong typecode is silently wrong geometry, not an error.
  • Canvas.road paints sky rows and the road span only - grass is yours. In a Scene the strip is cleared to the scene background first, so setup(background=GRASS) is enough (the example below does exactly that); outside a Scene, or for textured ground, fill the strip yourself (one view.fill_rect per strip) before calling view.road().
  • tab flags bit 0 = “this row may draw the centre dash”; other bits are reserved.
  • Hills are not in road_edges (its cfg is curvature-only): move the horizon per frame and re-derive ri0. The recipe, with its two setup consequences, is in the game-design skill’s racing section.
  • cfg curve frequencies are Q20 degrees per world unit: a curve pattern that repeats every D world units wants f1 = 360 * 2**20 // D. Amplitudes a1k/a2k are Q16, pre-multiplied by the per-row gain.
  • Numeric operating limit: the phase products wrap at ±2³¹ (the firmware accumulators are int32, and the sim wraps identically on purpose). With an arbitrary period the wrap point is not a whole number of sine periods, so the road pattern JUMPS there — at typical top speeds that is a visible glitch every minute or two of play. The fix is structural, not a bigger int: pick power-of-two periods so f = 360 * 2**20 / P is exact, and wrap your dist by the longest period (all cfg/d05/d07 phases stay continuous because it is a multiple of every period in play).

A complete minimal road - runs in the simulator as-is (the sim implements the pair bit-identically to the firmware):

from array import array
import picogame as pg
import picogame_game, picogame_clock
W, H = picogame_game.screen()
scene, bufA, bufB = picogame_game.setup(background=pg.rgb565(20, 60, 20)) # grass
clock = picogame_clock.Clock(30)
HORIZON = H // 3
N = H - HORIZON # road rows: 0 = horizon .. N-1 = bottom
rl = array("h", [0] * N); rr = array("h", [0] * N)
hw = array("i", [0] * N); tab = array("h", [0] * (5 * N))
for i in range(N): # perspective tables, built once
t = (i + 1) / N
hw[i] = int((W * 0.55) * t * 65536) # Q16 half-width, linear in the row
z = 1.0 / t # world depth of this row
tab[i*5 + 0] = max(2, int(10 * t)) # rumble edge width
tab[i*5 + 1] = max(1, int(4 * t)) # dash half-width
tab[i*5 + 2] = int(z * 40) & 0x7FF # stripe phase (Q8)
tab[i*5 + 3] = int(z * 80) & 0x7FF
tab[i*5 + 4] = 1 # bit0: dashes allowed on this row
COLORS = array("H", [pg.rgb565(90,140,230), # sky
pg.rgb565(110,110,110), pg.rgb565(100,100,100), # road A/B
pg.rgb565(220,60,60), pg.rgb565(240,240,240), # rumble A/B
pg.rgb565(240,240,90)]) # dash
CFG = array("i", [900, 350, 5200, 2600, 6, 2, N])
dist = 0
def draw(view, vx, vy, vw, vh):
view.road(vy - HORIZON, tab, rl, rr, dist * 3 & 0xFFFF, dist * 5 & 0xFFFF, COLORS)
scene.add(pg.StripDraw(draw, 0, 0, W, H))
while True:
dist += 4
pg.road_edges(rl, rr, hw, N, (W // 2) << 16, dist, CFG)
scene.refresh()
clock.tick()

pg.project + Canvas.fill_triangles - real polygon 3D

Section titled “pg.project + Canvas.fill_triangles - real polygon 3D”

Flat-shaded 3D boxes orbited by a free camera

Not a trick: a real perspective pipeline - batch-project arbitrary 3D points through a free camera in one C call, then fill the visible faces in a second. This is flat-shaded polygon 3D in the Elite / Star Fox lineage: no z-buffer (painter’s-sort your faces), no textures, but honest perspective and a camera that can truly rotate.

  • pg.project(cam, pts, n, out_sx, out_sy) - project n world points to int16 screen coords. cam = 15 params (eye, right, up, forward basis, focal, centre, near). A point behind the near plane gets the sentinel -32768 - skip any face that uses one.
  • Buffer formats follow pg.FPU: array("f") floats on an FPU board (RP2350, ESP32-S3), array("i") 16.16 fixed (int(v * 65536)) on the RP2040. A mismatch culls every point = black screen; branch once on pg.FPU at startup.
  • Canvas.fill_triangles(verts, colors, n) - fill the projected faces in one batch.

Per frame: transform is ~0.7 ms/480 points on an RP2350, ~2.2 ms on an RP2040 - projection is never the bottleneck; the fill and the refresh are. Draw into a half-res Canvas through a 2× sprite on RP2040 (a full-screen Canvas doesn’t fit); sort faces far-to-near with the ground plane always first.

Framebuffer boards (Fruit Jam): skip the canvas entirely. The Python heap lives in PSRAM there, so retained-Canvas fills pay external-memory writes (~7× slower than SRAM). The clean path is the pg.Triangles layer: fill your screen-space batch, set .count, and the compositor rasterises it entirely in C per strip — full resolution, zero retained pixel RAM, and (because no Python runs during compose) it stays compatible with the dual-core band split (pg.core1(True)) and clean of per-strip callback overhead. Roadhop-measured: a locked 30 fps at 320×240, and with a free second core + pg.vblank() even tear-free native 640×480 at 20 fps. (On older firmware the same batch replays from a StripDraw callback via view.fill_triangles(tv, tc, n, 0, -vy).) General rule for fb boards: keep retained canvases small or static; anything repainted every frame belongs in Triangles or a StripDraw.