Just the C engine (without the helpers)
The picogame_* Python libraries are ergonomics. The engine itself - import picogame - is a
native C module that already does all the heavy lifting: rendering, collision, transforms, noise,
raycasting, polygon 3D, the DVI framebuffer. You can build a real game against it with nothing but
the C module and stock CircuitPython. This page shows how, and what each helper actually adds on top.
What is in C, and what the helpers add
Section titled “What is in C, and what the helpers add”The C module (import picogame as pg) exports the engine:
- Types:
Scene,Sprite,Bitmap,Tilemap,Canvas,StripDraw,Particles,Triangles,Display,Framebuffer. - Functions:
render,collide,raycast,project,road_edges,value2d/fbm2dnoise,rgb565, ROMFS streaming. Two more exist only in fork builds:vblank(RP2350 DVI) andrefresh_async(behind an opt-in make flag) — guard them withhasattrif you use them.
That is every compute-heavy, distinctive capability - sprites with runtime scale/rotation and blit effects, dirty-rect compositing, 0-RAM tilemaps and strips, native text, collision, procedural noise, a raycaster, Mode-7, flat-shaded 3D, DVI output. The helper libraries do not hold any of that:
| Helper | What it adds | Do it yourself with… |
|---|---|---|
picogame_game |
boot wiring (Scene + Display + strip buffers) and cross-platform quirks (Fruit Jam DVI, RGB444, the simulator) |
one pg.Scene(pg.Display(board.DISPLAY), …) |
picogame_input |
buttons → a bitmask, over keypad/digitalio, with per-board pin profiles |
stock keypad / digitalio |
picogame_clock |
dt / fixed-step timing |
stock time.monotonic() |
picogame_ui / fx / anim / pool / rand |
HUD widgets, screen-shake/tween, animation timing, object pools, seeded RNG | plain Python |
picogame_audio / synth / sfx / save / music |
sound and persistence | stock audiocore / synthio / nvm |
Two things are worth stating plainly: input, audio and save are not in the engine at all - they
are stock CircuitPython. The engine only ever receives the result: a sprite’s position, a filled
buffer. Input in particular is a fully separate layer - you read the buttons, decide in Python that
something moves by N pixels, and just set sprite.x / sprite.y. The engine never sees a button.
A complete game with only the C module
Section titled “A complete game with only the C module”One helper import, picogame_game, and only to find the display and its size — everything that
draws, moves or collides below is the C module, plus stock board, time, array, terminalio
and digitalio. It moves a player with the D-pad, collects a coin via native collision, flashes on
pickup, and draws a native-text HUD.
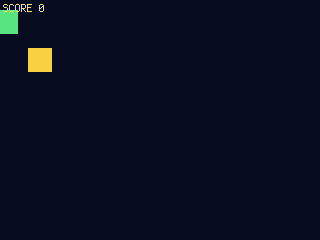
# A complete little game against the picogame C module ALONE.import board, time, arrayimport terminalio, digitalioimport picogame as pgimport picogame_game          # only for display() / screen(); nothing below needs it
W, H = picogame_game.screen()
# The only engine setup: a Scene on the display + two strip buffers it renders through.# Passing picogame_game.display() straight in is portable everywhere - SPI panels, framebuffers, the# playground. (Wrapping it in pg.Display(...) adds the fast DMA path on SPI boards; that and# the buffers are what picogame_game.setup() sorts out per board.)SH = getattr(pg, "STRIP_H", 8)scene = pg.Scene(picogame_game.display(), bytearray(W * SH * 2), bytearray(W * SH * 2),                 background=pg.rgb565(12, 14, 34))
# A sprite bitmap built by hand (PAL8, 1 byte/px).def square(color, size=6):    data = bytearray(b"\x01" * (size * size))    pal = array.array("H", [0, color])    return pg.Bitmap(data, size, size, format=pg.PAL8, palette=pal, frames=1, stride=size, transparent=0)
player = pg.Sprite(square(pg.rgb565(90, 230, 130)), W // 2, H // 2)player.anchor = (0.5, 0.5); player.scale = 4.0; scene.add(player)coin = pg.Sprite(square(pg.rgb565(250, 210, 70)), 40, 60)coin.anchor = (0.5, 0.5); coin.scale = 4.0; scene.add(coin)
# Input: stock digitalio on the board's buttons - the raw wiring picogame_input hides.def button(name):    io = digitalio.DigitalInOut(getattr(board, name))    io.switch_to_input(pull=digitalio.Pull.UP)     # PicoPad buttons are active-low    return ioLEFT, RIGHT, UP, DOWN = (button(n) for n in ("SW_LEFT", "SW_RIGHT", "SW_UP", "SW_DOWN"))def held(b): return not b.value                    # active-low: pressed -> False
# HUD: native Canvas.text into a 0-RAM StripDraw. The callback runs once per render# strip, so draw at (y - vy) for screen space; band >= the 12 px font height.score = 0BAND = terminalio.FONT.get_bounding_box()[1] + 4   # 12 + 4 = 16def hud(view, vx, vy, vw, vh):    view.text(3, 2 - vy, "SCORE %d" % score, pg.rgb565(255, 230, 90), terminalio.FONT)scene.add(pg.StripDraw(hud, 0, 0, W, BAND))
while True: if held(LEFT): player.x -= 3 if held(RIGHT): player.x += 3 if held(UP): player.y -= 3 if held(DOWN): player.y += 3 player.x = min(max(player.x, 6), W - 6) # keep on screen player.y = min(max(player.y, BAND + 6), H - 6) if player.overlaps(coin): # native C collision score += 1 coin.x = 30 + (score * 47) % (W - 60) coin.y = BAND + 12 + (score * 31) % (H - BAND - 30) player.flash = pg.rgb565(255, 255, 255) # native blit effect else: player.flash = 0 scene.refresh() # native dirty-rect compositor time.sleep(0.01)Scene + Sprite + overlaps + flash + Canvas.text + refresh are all the C engine; board,
digitalio, terminalio, time are stock CircuitPython. Nothing else.
Drawing straight onto a DVI screen
Section titled “Drawing straight onto a DVI screen”On a DVI board (Fruit Jam) a Canvas can draw directly into the picodvi.Framebuffer the screen
is showing — no Scene, no copy, no refresh call:
import board, displayio, picodvi, terminalioimport picogame as pg
displayio.release_displays()fb = picodvi.Framebuffer(320, 240, color_depth=16,    clk_dp=board.CKP, clk_dn=board.CKN,    red_dp=board.D0P, red_dn=board.D0N,    green_dp=board.D1P, green_dn=board.D1N,    blue_dp=board.D2P, blue_dn=board.D2N)
# The canvas draws straight into the memory the DVI output is scanning.screen = pg.Canvas(320, 240, buffer=fb)
def native(r, g, b):    # picodvi reads RGB565 in native byte order; pg.rgb565() is SPI byte order    return ((r & 0xF8) << 8) | ((g & 0xFC) << 3) | (b >> 3)
screen.clear(native(0, 0, 60))screen.fill_rect(10, 10, 100, 60, native(255, 0, 0))screen.fill_circle(200, 60, 40, native(0, 255, 0))screen.fill_triangle(40, 220, 140, 120, 240, 220, native(255, 255, 0))screen.text(20, 90, "Hello, DVI", native(255, 255, 255), terminalio.FONT)
pixels = memoryview(fb)          # the same pixels, one item per pixelpixels[120 * 320 + 160] = native(255, 255, 255)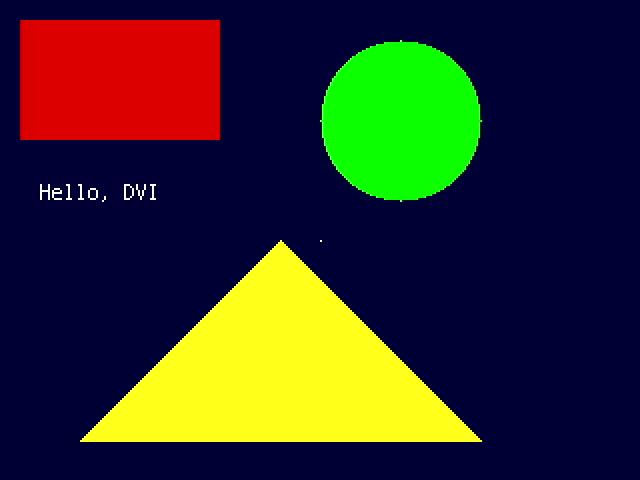
Two things to know:
- Colours. Every colour in picogame,
pg.rgb565()included, is in the byte order an SPI panel wants. picodvi reads plain RGB565, sopg.rgb565(255, 0, 0)shows blue here — use a smallnative()helper like the one above. - Shapes and text only.
Bitmappalettes are in SPI byte order too, so ablitinto this canvas comes out with swapped colours. For sprites, use aScenewithpg.Framebuffer(fb, 320, 240, native_rgb565=True)(whatpicogame_game.setup()does on a Fruit Jam), which converts once per frame. The canvas is RGB565, so this needscolor_depth=16.
What the helpers absorb
Section titled “What the helpers absorb”The fiddly parts of the code above are exactly what the helper libraries remove: placing HUD text
across render strips (picogame_ui.HudBar), wiring each button pin per board
(picogame_input.Buttons), frame-rate-independent timing (picogame_clock.Clock), and choosing the
right buffers and backend for each platform - SPI panel vs framebuffer, fast DMA where available
(picogame_game.setup()). None of it changes what the engine can do; it just deletes boilerplate.
When to use the engine directly
Section titled “When to use the engine directly”Reach for the raw C API when you want the smallest possible footprint, total control over the loop, to understand what the libraries do, or to build your own framework on top. For everything else the helpers are pure convenience - they save boilerplate and paper over board differences, but the game you can build is exactly as capable either way.